Big Wave Beach - Day 15
- For the Chinese version of the level, see Big Wave Beach - Day 15 (Chinese version).
- For the Chinese version of this level before the v1.8 update, see Big Wave Beach - Day 15 (Chinese version: pre-1.8).
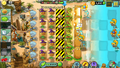
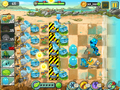
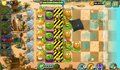
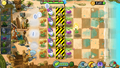
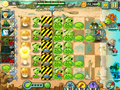
Big Wave Beach - Day 15 is the fifteenth level of Big Wave Beach in Plants vs. Zombies 2. It is a Save Our Seeds level. To complete this level, the player must protect five Potato Mines, all located in the third column. The tideline is located between the third and fourth column. When this level is finished for the first time, the player receives a note.
Dialogue
(After beating the level and obtaining the note)
Crazy Dave: Look! It must be time to play Beach Zombie Bungo!
Penny: Bingo, User Dave. It's BINGO.
Crazy Dave: You already won, Penny? Wow. You're good at this!
Difficulty
- In this level, the tides can reach up to the third column, with the third column being completely filled with endangered Potato Mines that can be triggered by Snorkel Zombies and Surfer Zombies that come up. Therefore, this level can be quite hard without lobbed-shot plants.
- Some sort of defense should be formed; as such, a Wall-nut or Tall-nut are vital to protect the endangered plants from Low Tides which are particularly strong in this level. A boosted Infi-nut by itself will not work well for long, as when the force field gets eaten, all other lanes become endangered.
- Pompadour Coneheads can appear on its own if the Dynamic Difficulty is high.
- There is a huge amount of zombies in this level, especially after the second flag.
Waves
- The small number next to the zombie icon means that zombie will always appear in that lane, with 1 being the topmost lane and 5 being the bottommost lane.
| Waves | Non-dynamic zombies | Ambush zombies | Tide level | Note(s) |
|---|---|---|---|---|
| 1 | None | 6
|
||
| 2 | None | 5
|
Carries 1x Plant Food. | |
| 3 | None | 4
|
Carries 1x Plant Food. | |
| 4 | None | 4
|
First flag. | |
| 5 | None | 3
|
||
| 6 | None | 3
|
||
| 7 | None | 3
|
||
| 8 | 1
|
Second flag. Low Tide! | ||
| 9 | None | 1
|
Carries 1x Plant Food. | |
| 10 | None | 1
|
||
| 11 | None | 1
|
||
| 12 | None | 4
|
Third flag. | |
| 13 | None | 5
|
||
| 14 | None | 6
|
||
| 15 | None | 6
|
Carries 1x Plant Food. | |
| 16 | 1
|
Final wave. Low Tide! |
Strategies
Strategy 1
- Created by AWPXML
- Required plants:
- Plant five Twin Sunflowers. When the first zombie comes, plant the Tangle Kelp in the fifth column.
- To kill the next few zombies, use Magnifying Grasses or Winter Melons (if you can afford it). Kill the two Snorkel Zombies with Tangle Kelp. Make sure you have at least one Winter Melon by the first flag. Save all your Plant Food.
- In the first flag, several Coneheads and Bucketheads will appear. Use Magnifying Grasses and Winter Melons to kill them.
- In the low tide and second flag, use a Cherry Bomb to kill most of the zombies. You should have about three Winter Melons at this point. If you need to, use Plant Food on an Iceberg Lettuce to freeze all the zombies.
- Do not panic when Surfer Zombies appear. Just use Plant Food on an Iceberg Lettuce if they are in the back, while the Winter Melons kill them. If they are up front, use a Magnifying Grass. You should have a whole column of Winter Melons at this point.
- In the final wave, use a Cherry Bomb and Magnifying Grasses to kill the large amount of zombies.
- Created by PeterGolovakov
- Required plants:
- Sunflower (PvZ2)
- Snapdragon
- Infi-nut
- Power Lily (if you have bought it)
- Lily Pad
- Tangle Kelp
- Bowling Bulb
- Make sure your Sunflower and Infi-nut are boosted if you do not have the Power Lily.
- Plant one column of Sunflowers in the first column while using Tangle Kelp to kill the first few zombies.
- Plant an Infi-nut in the middle of the fourth column and feed it Plant Food.
- Plant Snapdragons in all spaces in the Infi-nut's column.
- Plant one column of Bowling Bulbs between the Potato Mines and Sunflowers.
Strategy 3
- Created by Protanly
- Required plants:
- Sunflower
- Snapdragon
- Tall-nut
- Lily Pad
- Tangle Kelp
- Cherry Bomb
- Ghost Pepper (can be anything, but another instant will not hurt for this strategy)
- Imitater (if you have bought it. Not needed for strategy, but will save you some time)
- Make sure you set up your Sunflowers as quickly as possible behind the Potato Mines. Not only are they cheap with a fast recharge, but they also provide a good amount of sun from the start.
- Start setting up one lane of Snapdragons in front of the Potato Mines when the first zombies arrive.
- Begin planting your Lily Pads in front of the Snapdragons and plant Tall-nuts on top of them.
- Replace Tall-nuts when they become damaged.
- Use your instant-kill plants and Plant Food on the Surfer Zombies ONLY.
- Plant Food is best spent on Snapdragons to instantly kill the Surfer Zombies, which will come late in the level.
Strategy 4
- Created by GamesterD
- Required plants:
First, set up a column of Sun-shrooms. Plant a Primal Peashooter immediately after that. Use the Ghost Pepper if you do not have enough sun. When you are done, plant two columns of Chard Guard in front of the Potato Mines (remember the Lily Pads). Use Plant Food on Primal Peashooter or Ghost Pepper only if the zombies are very close to the Potato Mines. Primal Wall-nut should be used as well. Remember to replace the Chard Guards when all of their leaves are gone.
Strategy 5
- Created by VeXJL
Attention: This strategy should not be done on high Dynamic Difficulty.
- Required plants:
- Twin Sunflower
- Tangle Kelp
- Ghost Pepper (it would be really hard without it)
- Magnifying Grass
- Lily Pad
- Spring Bean
- Blover
- Some random plant if you rented or bought the eight slot
- First, set up your Twin Sunflowers. Stall the first few zombies with Ghost Pepper or Tangle Kelp. Be wary where you place the Tangle Kelp, as the tide goes down in the first wave.
- After setting up the Twin Sunflowers, start placing down Magnifying Grass. You can start using Magnifying Grass to kill zombies along with Ghost Pepper. Try to keep the zombies at least two or three tiles away from the Potato Mines.
- Place down two Lily Pads and place down a Spring Bean by the end of huge wave #2.
- When the Surfer Zombies appear, use Magnifying Grass to kill them instantly. If you cannot shoot the Surfer Zombies, use Plant Food on the Spring Bean then use Blover to kill all the zombies (use Blover when Spring Bean is in the air).
- When the last wave arrives, use the Spring Bean's Plant Food effect + Blover combo before they reach your Potato Mines.
Strategy 6
- Created by Comicboss4000
- Note : This strategy might need the player to use a Power Toss or a few additional launched lawn mowers.
- Required plants:
- Sunflower
- A.K.E.E.
- Gold Bloom
- Rotobaga
- Primal Wall-nut
- Lily Pad
- Tangle Kelp
- If you have the eighth seed slot, then Cherry Bomb
- 1. When the level starts, set up at least one column of Sunflowers in the back column and place Gold Bloom. Defeat the first few zombies with Tangle Kelp and Rotobaga. (Note : The Snorkel Zombie cannot be hit by Rotobaga, so use Tangle Kelp or A.K.E.E. against him)
- 2. At the first flag, place down more A.K.E.E.'s and Rotobagas. You should prepare yourself for the Low Tide ambush at the second flag, so quickly plant some Primal Wall-nuts in front of the endangered Potato Mines to barricade them.
- 3. Keep putting down Rotobagas and A.K.E.E.'s. It is recommended to have at least 1 column of A.K.E.E.'s, and just scatter Rotobagas around the lawn.
- 4. At the second flag, there will be a Low Tide ambush. The zombies from the ambush will start to eat the Primal Wall-nuts, which you (hopefully), have prepared already. If the Primal Wall-nuts look a bit damaged, put Wall-nut First Aid on them to heal them.
- 5. Throughout the latter part of the level (after the second flag and through the third flag), Bikini Bucketheads will come. Do not use Plant Food to defeat them, just defeat them with your barricading Primal Wall-nuts and Rotobagas.
- 6. In the third flag, Surfer Zombies will start to arrive. Because their speed is very quick and they are a potential hazard to your defenses, use Tangle Kelp to defeat them. If you had the eighth seed slot and picked Cherry Bomb, then explode them with Cherry Bomb. However, if either of these instant-use plants are not recharged yet, just place Plant Food on the Rotobaga or A.K.E.E. If that STILL does not work, the only thing you can do is to use the Power Toss to toss the Surfer Zombies and other zombies away.
- 7. In the final flag, another Low Tide ambush will happen. For this one, just put Plant Food on A.K.E.E. or Rotobaga. That should kill them pretty good. Cherry Bomb could be another alternative, too.
- By closely following this strategy, you should have beaten this level by now. It is NOT that hard, people.
Strategy 7
- Created by 7 GRAND UMP
- Required plants:
First, set up a column of Sun-shrooms. Take out the starting zombies using Tangle Kelps. After getting the first Plant Food, place an Infi-nut in the middle row in front of the Potato Mines. Use Plant Food on the Infi-nut, plant Bonk Choys in the rows behind the force field, plant Magnifying Grasses behind the Potato Mines, and the level should be a breeze from there. Try to save Plant Food for healing the force field, as it will get hurt badly. Only use Cherry Bombs when groups of zombies/Low Tide ambushes happen. Try to use Tangle Kelps to take out any tough zombies. Use Magnifying Grass as your main attacking plant, as Bonk Choys are only there for back-up.
Strategy 8 (called Kill with Grass!)
Created by El777Verg
- Required plants:

 (or other sun-producer)

 (or other defensive plant)
 - Suggested plants:
 (for emergencies)
 - Plant your sun-producer and Magnifying Grass.
- Use Tangle Kelp to deal with Snorkler Zombies.
- Hits from Level 2 Magnifying Grass:
- Basic Zombie/Imp/Conehead Zombie/Surfer Zombie on land - 1 hit
- Surfer Zombie on water - 2 hits
- Buckethead Zombie - 3 hits
- Plant your defensive plant when a zombie will be close.
Strategy 9
Created by mastersneeza
- Required Plants:
- Sunflower (PvZ2)
- Lily Pad (PvZ2)
- Tangle Kelp (PvZ2)
- Hurrikale (or anything else that can push zombies away)
- Cherry Bomb (PvZ2)
- Wall-nut (PvZ2)
- Lightning Reed (PvZ2)
- First, plant 2 Sunflowers in the back column
- Kill the first zombie with Tangle Kelp
- Continue planting one more Sunflower
- Kill the first Snorkler with Tangle Kelp, and start placing Lily Pads on columns 4 and 5
- Once the first flag starts place a Lightning Reed in the fourth lane in the second column. Place Wall-Nuts on the fifth column. Continue planting Sunflowers
- Continue planting Lightning Reeds on the second and fourth column
- Once the Surfer zombies appear, kill the one on the first lane with tangle kelp
- Use Hurrikale during the low tide if you need it
- Use Cherry Bomb during low tides and the final wave if necessary
Gallery

First time reward in this level
Strategy by Protanly
Strategy by Master3530
Nicko756 #1
Nicko756 #2
Nicko756 #3
Nicko756 #4
Strategy by Johnnytuan
EpicGamer23468's second setup
Foxtail Firepaw Flames' setup (which requries no plants ahead of BWB or premiums(/gemiums/epic quests plants)
By VeXJL
By Someone456


Walkthrough
- Big Wave Beach Day 15
- Plants vs. Zombies 2 Protect plant Potato Mine - Big Wave Beach Day 15 (Ep.402)
By Alex5432000
Trivia
- Day 15 of Big Wave Beach is the second level where the player must defend an endangered plant that explodes if touched by zombies, with a Piñata Party being the first.
- *: Removed ~: Epic Quest
<poll> How would you rate Big Wave Beach - Day 15's difficulty? Very hard Hard Somewhat hard Medium Somewhat easy Easy Very easy </poll>