Big Wave Beach - Day 25
- For the Chinese version of the level, see Big Wave Beach - Day 25 (Chinese version).
Big Wave Beach - Day 25 is the twenty-fifth level of Big Wave Beach in Plants vs. Zombies 2. In this level, the player is given two objectives: "spend no more than 3000 sun" and "defeat 10 zombies within 5 seconds". The tideline is located between the third and fourth column. When this level is finished for the first time, the player gets a Big Wave Beach piñata.
Difficulty
- With the only amount of sun to be spent must be less than or equal to 3000, with three flags, and with the combination of all hard zombies present in the level, it is very hard to complete as the zombies will destroy the defense very soon. Adding up the Fisherman Zombie, Octo Zombie, Surfer Zombie, and Deep Sea Gargantuar, the level is extremely hard to beat.
- Surprise attacks also contribute to the difficulty of the level as it can send many strong zombies such as Deep Sea Gargantuar and Octo Zombie halfway into the lawn, further limiting planting options.
Waves
- The small number next to the zombie icon means that zombie will always appear in that lane, with 1 being the topmost lane and 5 being the bottommost lane.
| Waves | Non-dynamic zombies | Ambush zombies | Tide level | Note(s) |
|---|---|---|---|---|
| 1 | None | 4
|
||
| 2 | None | 4
|
||
| 3 | None | 4
|
Carries 1x Plant Food. | |
| 4 | None | 5
|
||
| 5 | None | 5
|
||
| 6 | None | 5
|
First flag. Carries 1x Plant Food. | |
| 7 | None | 6
|
||
| 8 | 1
|
Low Tide! | ||
| 9 | None | 1
|
Carries 1x Plant Food. | |
| 10 | None | 3
|
||
| 11 | None | 6
|
||
| 12 | None | 6
|
Second flag. Carries 1x Plant Food. | |
| 13 | None | 6
|
||
| 14 | None | 6
|
||
| 15 | 1
|
Low Tide! Carries 1x Plant Food. | ||
| 16 | None | 1
|
||
| 17 | None | 1
|
Carries 1x Plant Food. | |
| 18 | None | 1
|
Final wave. |
Strategies
Strategy 1
- Created by AWPXML
- Required plants:
- Note: You will need the Mower Launch upgrade from Far Future - Day 20.
- Plant a full column of Sun-shrooms in the first column. Use Puff-shrooms and Snapdragons to kill the first few zombies.
- When the first Fisherman Zombie appears, stall it with Puff-shrooms. Once you get the Plant Food, plant an Infi-nut on the fourth column, third lane and feed it Plant Food.
- In the first flag, an Octo Zombie will appear. Do not worry about it, since the Snapdragons can easily destroy the octopus it throws. If the Surfer Zombie is in the third lane, use Guacodiles to kill it before it reaches your Infi-nut.
- Shortly after the first flag, a low tide will occur. Hover a Cherry Bomb over the fifth column, third lane and be ready to plant it as soon as the low tide occurs. This prevents the Surfer Zombies from destroying your Infi-nut if it spawns in the third lane.
- If at any time the Infi-nut's shield looks weak, use Plant Food on the Infi-nut to restore the shield's health.
- In the second low tide, launch the lawn mower in the lane with the Deep Sea Gargantuar. Right when the lawn mower is halfway through the lawn, plant a Cherry Bomb where a lot of zombies are grouped together to successfully complete the second objective.
- In the final wave, use Cherry Bombs and Plant Food on your Snapdragons and to easily kill the two Gargantuars and other zombies.
Strategy 2 (Contains gemium content)
- Created by RaidingParty
This strategy can complete the level without using Plant Food, paid content such as extra slots, or losing lawn mowers. It does require the use of the Homing Thistle, as well as very skillful reflexes and ability to track the enemies.
- Required plants:
- Note: Lily Pads are NOT used.
The goal is to get seven to eight Homing Thistles up asap, without letting Fishermen or Octos wipe them out. Plant five Sun-shrooms in the third column. Most of them will be drowned, crushed by surfboards, or bound by octopuses by the halfway point, but they will have produced most of the sun you need and will serve as a buffer. Delay the first four zombies with Iceberg Lettuce and Puff-shrooms until most or all the Sun-shrooms have all grown a level, then begin planting the first four Homing Thistles in the first column. Plant Puff-shrooms wherever there is space, including even in wet sand. Use Puff-shrooms as well to destroy surfboards that have landed on dry land or free any plant that has been hit with octopi.
Kill Fishermen and Octos on sight with Tangle Kelp, prioritizing the Fishermen first. If you are waiting on Kelp recharge to get rid of multiple Fishermen, use Puff-shrooms and a Sun-shroom to distract them both, and when possible kill the one dragging a Sun-shroom first. Octos that are left wandering around can be frozen with Iceberg Lettuce if on land and then surrounded with Puff-shrooms, and can also distracted by planting Puff-shrooms and if need be a Sun-shroom. You can dig up mushrooms before they are octopied to waste the Octo's attack, but even if an octopus connects you can often still free the plant using a Puff-shroom.
At the first Low Tide ambush, use a Cherry Bomb to complete Objective 2; look for the thickest group possible. If you miss, you can still get the objective at the second Low Tide, though it will be riskier to do so. After bombing, throw Puff-shrooms, Sun-shrooms, and Iceberg Lettuce wherever they are needed to distract Surfers and Octos. By now the Homing Thistles should be able to handle the common zombies, but make sure to keep planting enough to reach seven or eight total.
In the lead-up to the second Low Tide ambush, watch out for multiple Fishermen and make sure to prioritize ones that are dragging Sun-shrooms or are located where you have limited room to plant. At the second Low Tide, Cherry Bomb the Gargantuar so that you kill the Octos and other zombies around it, then freeze it with Iceberg Lettuce. Kill any Fisherman still alive in its lane (distract it first if need be), then plant a Chard Guard as far away as possible. Turn your attention to any surviving Octos/Fishermen and deal with them. If by mistake you allow Octos to hit too many Homing Thistles with octopi, fight on until you have enough sun and recharge to free them with another Cherry Bomb. If enough Homing Thistles are still active, they will kill the common zombies and eventually the Gargantuar.
The final two Gargantuars can be defeated easily with even a single Chard guard, as long as enough Homing Thistles are still active; use one to knock one back and spam Iceberg Lettuce or Puff-shrooms to delay the other (make sure to kill any Fishermen in their lanes first).
Strategy 3
- Created by A plant
- Required plants:
Starting
You first plant Sun-shrooms in the first row. Dig up the three Lily Pads Then when the Snorkel Zombie gets close, plant a Red Stinger in the second row. After that, three zombies will come. Plant a Snapdragon in the second column third row. Use a Red Stinger to kill the bottom row zombie. Plant a Tangle Kelp to kill the Fisherman Zombie. Plant a Snapdragon in the fourth column third row, and plant a Red Stinger in the third column second row to kill the Buckethead. Once you get the Plant Food, immediately plant an Infi-nut and use Plant Food on it.
First flag
Start planting more Red Stingers in the second row. Also plant Snapdragons in the third row. After that, you should be set. If the Infi-nut's shield is at its last degrade, or when it is finished. Plant Cherry Bombs when things go rough, and be sure to save at least 600 sun.
Second flag
A Deep Sea Gargantuar appears at the end of this wave. Surfer Zombies should not be a threat, as they cannot hit the plants. When the Deep Sea Gargantuar comes, use a Cherry Bomb and after that, immediately use Plant Food on the Cherry Bomb's seed packet and use it on the Deep Sea Gargantuar again, killing the Gargantuar, and if more quickly, the Imp Mermaid.
Huge wave
This should be your final wave. Use Cherry Bombs on the Gargantuar's row which doesn't have a lawn mower. If both rows have, then just simply leave have no defense, or you can kill one if you have two Plant Foods by using by using Plant Food on a Red Stinger, use a Cherry Bomb on the top row, use Plant Food on the Cherry Bomb seed packet and use the Cherry Bomb. If you have a left over Plant Food, use it on a Red Stinger to kill the final Gargantuar.
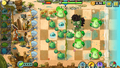
Layout
This should be the layout you should have.
Gallery

By VeXJL
No lawn mower, no power-ups, only four boosted plants

By Someone456

No levelling, lawnmowers, boosts, power-ups, nor premiums/gemiums by Astephen542


Walkthrough
- *: Removed ~: Epic Quest
<poll> How would you rate Big Wave Beach - Day 25's difficulty? Very hard Hard Somewhat hard Medium Somewhat easy Easy Very easy </poll>