Electrical Boogaloo

- Not to be confused with the hero with a similar name from Plants vs. Zombies Heroes.

Electrical Boogaloo was the fourth Epic Quest in Plants vs. Zombies 2 introduced in the 4.7 update. This series of levels revolved around Electric Currant, a plant which was obtainable as a reward when completed. To unlock it, the player had to complete the Beghouled Blitz Epic Quest, after the player goes to the map.This Epic Quest was removed in 6.2.1 update as Electric Currant became a gem premium plant.
Step 1
Complete each step in the Epic Quest chain for an awesome reward!
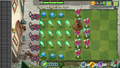
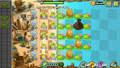
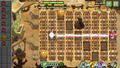
This level was a modified version of Modern Day - Day 4, but instead of a normal level, it was a Special Delivery, so the player didn't need to choose their plants.
Waves
- The small number next to the zombie icon means that zombie will always appear in that lane, with 1 being the topmost lane and 5 being the bottommost lane.
| Waves | Non-dynamic zombies | Ambush zombies | Note(s) |
|---|---|---|---|
| 1 | None | ||
| 2 | None | ||
| 3 | None | ||
| 4 | None | First flag. Carries 1x Plant Food. | |
| 5 | None | ||
| 6 | None | Carries 1x Plant Food. | |
| 7 | None | ||
| 8 | None | Second flag. | |
| 9 | None | Carries 1x Plant Food. | |
| 10 | None | ||
| 11 | None | ||
| 12 | None | Final wave. |
Gallery
Done by Pmhpc

Walkthrough
- Plants vs Zombies 2 - Epic Quest Electrical Boogaloo - Step 1
- Plants vs. Zombies 2 - Epic Quest Electrical Boogaloo! - Stage 1
Step 2
Get tricky with sliders and the incomparable Electric Currant!
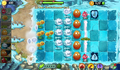
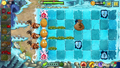
This level was a modified version of Frostbite Caves - Day 6, where the Electric Currant was first showcased. It included various Far Future zombies and some native ones, plus Relic Hunter Zombie, which should be considered a big threat, as it can reach the top and bottom rows, eating the Electric Currants.
Waves
- The small number next to the zombie icon means that zombie will always appear in that lane, with 1 being the topmost lane and 5 being the bottommost lane.
| Waves | Non-dynamic zombies | Ambush zombies | Note(s) |
|---|---|---|---|
| 1 | None | ||
| 2 | None | ||
| 3 | None | Carries 1x Plant Food. | |
| 4 | None | ||
| 5 | None | First flag. Carries 1x Plant Food. | |
| 6 | None | ||
| 7 | None | ||
| 8 | None | Carries 1x Plant Food. | |
| 9 | None | ||
| 10 | None | Final wave. |
Gallery

Done by Pmhpc
Done by Satirelol200


Walkthrough
- Plants vs Zombies 2 - Epic Quest Electrical Boogaloo - Step 2 Pinata Party 4 06 2016 (April 6th)
- Plants vs. Zombies 2 - Epic Quest Electrical Boogaloo! - Stage 2
Step 3
Blast 80s baddies with Electric Blueberry!
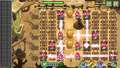
This level was a modified version of Neon Mixtape Tour - Day 19, where the main change was the addition of Wizard Zombies. The rest of the level seemed to be similar to the original.
Waves
- The small number next to the zombie icon means that zombie will always appear in that lane, with 1 being the topmost lane and 5 being the bottommost lane.
| Waves | Non-dynamic zombies | Ambush zombies | Note(s) |
|---|---|---|---|
| 1 | None | ||
| 2 | None | ||
| 3 | None | Rap plays. Carries 1x Plant Food. | |
| 4 | None | First flag. | |
| 5 | None | Punk plays. Carries 1x Plant Food. | |
| 6 | None | ||
| 7 | None | Rap plays. Carries 1x Plant Food. | |
| 8 | None | Second flag. | |
| 9 | None | Carries 1x Plant Food. | |
| 10 | None | Punk plays. | |
| 11 | None | ||
| 12 | None | Final wave |
Gallery

Done by Pmhpc

Done by Satirelol200


Walkthrough
- Plants vs Zombies 2- Epic Quest Electrical Boogaloo - Step 3
- Plants vs. Zombies 2 - Epic Quest Electrical Boogaloo! - Stage 3
Step 4
Move Electric Currants on mine carts to zap hapless zombies!
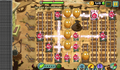
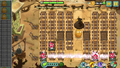
This level wasn't a modified version of any pre-existent level, instead, it was a Wild West Special Delivery level with only Electric Currants and Wall-nuts. In order to win, the player must plant the Electric Currants on the mine tracks and move them around strategically to zap the zombies.
Waves
- The small number next to the zombie icon means that zombie will always appear in that lane, with 1 being the topmost lane and 5 being the bottommost lane.
| Waves | Non-dynamic zombies | Ambush zombies | Note(s) |
|---|---|---|---|
| 1 | None | ||
| 2 | None | Carries 1x Plant Food. | |
| 3 | None | ||
| 4 | Carries 1x Plant Food. Bot Swarm! | ||
| 5 | None | First flag. | |
| 6 | Carries 1x Plant Food. Bot Swarm! | ||
| 7 | None | Carries 1x Plant Food. | |
| 8 | Bot Swarm! | ||
| 9 | None | Carries 1x Plant Food. | |
| 10 | Final wave. Bot Swarm! |
Gallery
Done by Pmhpc
By Satirelol200


Walkthrough
- Plants vs. Zombies 2 - Epic Quest Electrical Boogaloo! - Stage 4
Step 5
Take a relaxing banana break at the Big Wave Beach!
This level appeared to be identical to Big Wave Beach - Day 26, with no apparent changes, so this level should not be a problem. The main threats are the Surfer Zombies and the Deep Sea Gargantuars, so they should be the priority target to send in Banana Launcher's bananas.
Waves
- The small number next to the zombie icon means that zombie will always appear in that lane, with 1 being the topmost lane and 5 being the bottommost lane.
| Waves | Non-dynamic zombies | Ambush zombies | Note(s) |
|---|---|---|---|
| 1 | None | ||
| 2 | None | Carries 1x Plant Food. | |
| 3 | None | ||
| 4 | None | ||
| 5 | None | Carries 1x Plant Food. | |
| 6 | None | ||
| 7 | None | ||
| 8 | None | Carries 1x Plant Food. | |
| 9 | None | ||
| 10 | None | Carries 1x Plant Food. | |
| 11 | None | ||
| 12 | None | Carries 1x Plant Food. | |
| 13 | None | ||
| 14 | None | Carries 1x Plant Food. | |
| 15 | None | Final wave. |
Gallery
Done by Pmhpc

Walkthrough
- Plants vs Zombies 2 - Epic Quest Electrical Boogaloo - Step 5
- Plants vs. Zombies 2 - Epic Quest Electrical Boogaloo! - Stage 5
Step 6
Set up sneaky blast zones with Electric Currants and sliders!
This level was again a modified version of Frostbite Caves - Day 6, and very similar to the Step 2 of this quest. However, this time the level is harder, and counts with the addition of Jester Zombies and Robo-Cone Zombies along with Relic Hunter Zombies.
Waves
- The small number next to the zombie icon means that zombie will always appear in that lane, with 1 being the topmost lane and 5 being the bottommost lane.
| Waves | Non-dynamic zombies | Ambush zombies | Note(s) |
|---|---|---|---|
| 1 | None | ||
| 2 | None | ||
| 3 | None | Carries 1x Plant Food. | |
| 4 | None | ||
| 5 | None | First flag. Carries 1x Plant Food. | |
| 6 | None | ||
| 7 | None | ||
| 8 | None | Carries 1x Plant Food. | |
| 9 | None | ||
| 10 | None | Final wave. |
Gallery
Done by Pmhpc

Walkthrough
- Plants vs Zombies 2 - Epic Quest Electrical Boogaloo - Step 6
- Plants vs. Zombies 2 - Epic Quest Electrical Boogaloo! - Stage 6
Step 7
Yikes! More mine cart madness! CAN YOU PREVAIL???
Similar to Step 4, this level was a Wild West Special Delivery where the only plants are Electric Currants and Wall-nuts. But the player needed to be careful, as the Far Future zombies have been replaced with Prospector Zombies, which are a threat since they can eat the Electric Currants from behind, erasing their electric fences.
Waves
- The small number next to the zombie icon means that zombie will always appear in that lane, with 1 being the topmost lane and 5 being the bottommost lane.
| Waves | Non-dynamic zombies | Ambush zombies | Note(s) |
|---|---|---|---|
| 1 | None | ||
| 2 | None | Carries 1x Plant Food. | |
| 3 | None | First flag. | |
| 4 | None | Carries 1x Plant Food. | |
| 5 | None | Carries 1x Plant Food. | |
| 6 | None | Second flag. | |
| 7 | None | Carries 1x Plant Food. | |
| 8 | None | Carries 1x Plant Food. | |
| 9 | None | Final wave. |
![]() - never carries metal grate
- never carries metal grate
![]() + always carries metal grate
+ always carries metal grate
![]() randomly carries metal grate
randomly carries metal grate
Gallery
Done by Pmhpc

Walkthrough
- Plants vs Zombies 2 - Epic Quest Electrical Boogaloo - Step 7
- Plants vs. Zombies 2 - Epic Quest Electrical Boogaloo! - Stage 7
Step 8
Garlic and Magnets and Currants, Oh My!
A modified version of Modern Day - Day 4, where a large quantity of Buckethead Zombies appear along with Knight Zombies, so the given Magnet-shroom must be used in order to render them useless. Two Garlics were already pre-planted in order to give the player an idea where to plant the Electric Currants that were pre-selected.
Waves
- The small number next to the zombie icon means that zombie will always appear in that lane, with 1 being the topmost lane and 5 being the bottommost lane.
| Waves | Non-dynamic zombies | Ambush zombies | Note(s) |
|---|---|---|---|
| 1 | None | ||
| 2 | None | ||
| 3 | None | ||
| 4 | None | First flag. Carries 1x Plant Food. | |
| 5 | None | ||
| 6 | None | ||
| 7 | None | ||
| 8 | None | Second flag. | |
| 9 | None | Carries 1x Plant Food. | |
| 10 | None | ||
| 11 | None | ||
| 12 | None | Final wave. |
Gallery

Done by Pmhpc

Walkthrough
- Plants vs Zombies 2 - Epic Quest Electrical Boogaloo - Step 8
- Plants vs. Zombies 2 - Epic Quest Electrical Boogaloo! - Stage 8
Step 9
Smash, bash and mash zombies with huge rolling rocks!
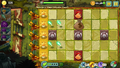
A modified version of Lost City - Day 22, where the Red Stinger had been replaced with Lightning Reed and Iceberg Lettuce had been replaced with another Puff-shroom (not an imitated one), and a Disco-tron 3000 had been added. Otherwise, the level is the same, and planting the Puff-shrooms on the boulder traps to kill the zombies should be enough to win the level.
Waves
- The small number next to the zombie icon means that zombie will always appear in that lane, with 1 being the topmost lane and 5 being the bottommost lane.
| Waves | Non-dynamic zombies | Ambush zombies | Note(s) |
|---|---|---|---|
| 1 | None | ||
| 2 | None | Carries 1x Plant Food. | |
| 3 | None | ||
| 4 | None | ||
| 5 | None | Carries 1x Plant Food. | |
| 6 | First flag. Parachute Rain! | ||
| 7 | None | ||
| 8 | None | ||
| 9 | None | ||
| 10 | None | Final wave. |
Gallery
Done by Pmhpc

Walkthrough
- Plants vs Zombies 2 - Epic Quest Electrical Boogaloo - Step 9
- Plants vs. Zombies 2 - Epic Quest Electrical Boogaloo! - Stage 9
Step 10
It's the sense-shattering finale to the Electrical Boogaloo!
Another Wild West Special Delivery level, like step 4 and 7, but this one was even harder, with only minecarts and more zombies coming from every row, and now a Wild West Gargantuar also appeared. The player must have mastered the usage of Electric Currants with Plant Food, otherwise the level will be nearly impossible, due to the dangerous zombies and the lack of non-minecart tiles.
Waves
- The small number next to the zombie icon means that zombie will always appear in that lane, with 1 being the topmost lane and 5 being the bottommost lane.
| Waves | Non-dynamic zombies | Ambush zombies | Note(s) |
|---|---|---|---|
| 1 | None | ||
| 2 | None | Carries 1x Plant Food. | |
| 3 | None | ||
| 4 | None | First flag. Carries 1x Plant Food. | |
| 5 | None | ||
| 6 | None | Carries 1x Plant Food. | |
| 7 | None | ||
| 8 | None | Second flag. Carries 1x Plant Food. | |
| 9 | None | ||
| 10 | None | Carries 1x Plant Food. | |
| 11 | None | Carries 1x Plant Food. | |
| 12 | None | Final wave. |
Gallery
Done by Pmhpc

Walkthrough
- Plants vs Zombies 2 - Epic Quest Electrical Boogaloo - Step 10 Unlock Electric Currant
- Plants vs. Zombies 2 - Epic Quest Electrical Boogaloo! - Stage 10
In other languages
Please note that only official translations are used.
| Language | Name | Description |
|---|---|---|
| Electrical Boogaloo | ||
| Boogaloo électrique | ||
| Elektr. Boogaloo | ||
| Onda elettrica | ||
| Dança Eletrizante | ||
| Bugalú eléctrico |
Trivia
- This quest has a similar name to a hero from Plants vs. Zombies Heroes, Electric Boogaloo.
- Similarly to that hero's name, the quest's name is derived from the movie Breakin' 2: Electric Boogaloo.
- This quest's name is also similar to Robots 2: Electric Boogaloo from Bookworm Adventures 2, another game made by PopCap.
- Steps 1, 3, 5, and 9 are the only steps in this Epic Quest that do not feature the unlockable plant, Electric Currant.
- *: Removed ~: Epic Quest
- Archived
- Modern Day
- Modern Day levels
- Levels
- Plants vs. Zombies 2
- Plants vs. Zombies 2 levels
- Frostbite Caves
- Frostbite Caves levels
- Neon Mixtape Tour
- Neon Mixtape Tour levels
- Wild West
- Wild West levels
- Big Wave Beach
- Big Wave Beach levels
- Lost City
- Lost City levels
- Epic Quests
- Levels where Treasure Yeti never appears
- Levels with pre-placed plants